Saturday, December 15, 2012

Turpatoes Au Rockin'


It seems a fitting thing to post something new now that I’m done with the semester.  Around here, we have been on a turnip kick lately.  We’ve sautéed them in with our taco meat, cooked them with our roast, and slipped them into other dishes here and there.  We’ve missed the blank pallet that is the potato, but will not welcome them back through the door. 

I had tried mashed turnips a while back, but frankly, I don’t like turnips.  They were simply slimy and bitter.  However, when boiled with some chicken bouillon or broth, that all changes.  It seems to tone down the bitter spike and make them meld well with other flavors.

Since finding that out, I’ve been on a search for that potato substitute for the Christmas dinner table.  After reading recipe after recipe, I think I’ve come up with our new go-to dish to fill that need.


Turpatoes Au Rockin’
A turnip-based alternative to Potatoes Au Gratin

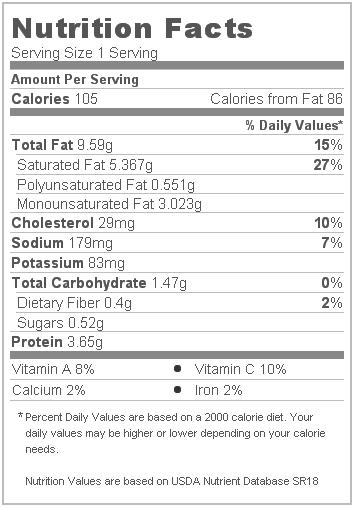
Serves 4, @ 7.36 net carbs per serving

4 softball-sized turnips
¼ cup warm water
1 tsp chicken bullion
Spices to taste—pepper, garlic powder, onion powder, etc.
¼ cup half and half
½ teaspoon xantham gum
Shredded Cheese (@ 2 cups)
Real Bacon Bits

Set oven to 350⁰.

Peel and thinly slice turnips.  Place in boiling water for 10 minutes.  Remove from heat, drain and let cool until able to handle.*

Mix warm water with bullion and spices in a squirt bottle or small bowl.  Add in half and half, and sprinkle in xantham gum.  Shake well to mix.

Grease a small casserole dish.  (Judge this by the amount of turnips you have ready.)  Cover the bottom with one layer of turnips.  Squirt or sprinkle the liquid mix over the turnips.  Sprinkle lightly with cheese.  Continue layering, ending with cheese and a sprinkling of bacon bits.

Bake covered for 20 minutes, then uncover and bake until top is pleasingly melty.  You can pull them out when the cheese is just melted, or you can leave them in until you get that nice crusty cheese top—it’s up to you.

*You can skip this step, but will need to bake the turpatoes longer.  Check their doneness by inserting a butter knife into the dish.  If there’s little or no resistance, the turpatoes are done.
There is, of course, a lot of room for variation here.  Try layering in some minced onions or sautéed mushrooms.  Wanna add a layer of spinach or kale?  Cook/defrost, drain and squeeze the spinach well, then layer on top of the turnips, topping with the liquid mix and cheese. 

Try some ranch dressing in place of some of the half and half.

In general, Potatoes Au Gratin have about 30 grams of carbs per serving, so while this is a bit high for a highly restricted carb diet, it beats the original hands-down. 


Tuesday, August 7, 2012

You Can Pickle That!

WARNING: This Process is Deadly!  You can die  Read this

But, really, people have been pickling and canning things for ages.  So, let me say, I'm no expert and you proceed at your own risk.  Here are some basic history and guidelines.  Here's a basic pickle recipe.


Still not afraid? Okay, let's go.  I've linked to a couple of recipes below and given one that I bashed together from a few I read on the web. There are so many good ones out there that have been tested, so this isn't really about the recipe, it's more about the process.  But first, a word from a non-sponsor: 


One of my favorite episodes of Portlandia is the "You can Pickle That" episode.  It's resulted in the phrase being bandied around our house from time to time.


Technical Notes: A couple of things that seem to come up consistently in pickling are 


  • the need to use pickling or canning salt, 
  • the need to make sure you have a good vinegar to water ratio, and 
  • the need to make sure that your vinegar is at least 5% acidity.  
Those are just some of my pickling discoveries along the way.


So, here's what I'm going to pickle:


Zucchini, Armenian Cucumbers, and Jalapenos

Here's various stages of the process just for fun:

The zucchini spears.                       The zucchini spears in their ice bath.


Pickling spices in jars                         Filling it all up.


Ready to go in the canner                        My, that's hot! 


All in all, a good day's work. 
Zucchini pickles: 3 quarts; 
Spicy pickles: 2.5 quarts; 
Dill pickles: 9.5 quarts; and 
3 half pint jars of jalapeno relish. 


The simple jalapeno recipe I used.

The recipe I used for Armenian Dill Pickles.

I modified a few recipes I found on the web for the Zucchini Pickles I made, and I ended up with this:
___________________________________________________


Spicy Zucchini Pickles
Makes 2 Quarts

1          pound zucchini (or any summer squash)
2          tablespoons sea salt or pickling salt

Cut zucchini to desired shape—slices or spears. Add  salt and 4 cups ice.  Add cold water to cover.  Top with a plate to keep submerged. Let sit for 2 hours.  Drain and rinse, and drain again.  Use salad spinner if desired.

Divide the following ingredients between hot 1-quart jars; set aside.
1          tablespoon dill seeds (or fresh dill sprigs 12 per batch)
2          teaspoons red pepper flakes or 4 red jalapeños or Fresno chiles, split lengthwise
4          garlic cloves, halved
1          teaspoon black peppercorns
1          teaspoon coriander seeds
1          teaspoon mustard seeds


2          cups white vinegar
1¼        cups water
4          garlic cloves, lightly smashed
2          tablespoons sea salt or pickling salt

Bring vinegar, salt, and water to a boil in a large saucepan. Working in batches, add zucchini and cook, stirring occasionally until khaki in color and slightly pliable, about 2 minutes. Using tongs, transfer zucchini to jars.

Divide remaining hot liquid between jars to cover zucchini, leaving 1/2 inch space on top.  Wipe rims, seal, and process in boiling water bath for 10 minutes.  Allow at least a week to pickle before eating.

____________________________________________________


Learn more at these cool canning websites:

And remember. . .
You can pickle that!

Wednesday, July 18, 2012

Well, hello Not-Pasta Pasta!

Yesterday I brought in a zucchini the size of a baseball bat.  I've been very good this year about catching them before they sneak up to gigantic sizes, but this one was very stealthy.   It also was a perfect candidate for zucchini noodles.  On top of that, the process is as easy as growing giant zucchini.

These aren't noodles.  They are zucchini.  However, they carry both classic pasta sauce and Alfredo wonderfully.  Begin to make your noodles by peeling the zucchini and then using a julienne peeler, go around the zucchini creating long noodles.

This is from the baseball bat sized zucchini I brought in yesterday.

There are two different methods for doing this.  With both, most directions suggest that you sprinkle the noodles with about a teaspoon of salt and let it sit in a colander for about 20 minutes to get the extra moisture out.

Sauted
After letting the zucchini set, toss it in a skillet with some butter and garlic and saute until it's fairly soft.  You don't want it mushy.

Blanched
Place in a pot of boiling water and boil for about 2 minutes.  (Mine took a bit longer, but we're at a higher altitude.)  Once it's the consistency you like, pull it out and rinse it with cold water to stop the cooking.  I suggest pulling them a little bit before you think they're done..  I wish I would have the first time.

Top either one with your favorite sauce.  Last night I made a sauce with about a pound of meat, one can of diced tomatoes, one can of tomato sauce (@15 oz.), and a small can of tomato paste.  I cooked up the meat with onions and garlic, tossed in some Italian seasoning and salt, then threw in the tomato products and let it all simmer.  

'Twas delicious served with some cheesy bread bread sticks.

There are tons of great sites that go through this process in more depth.  Check some of them out:
http://www.asweetpeachef.com/pasta/how-to-make-zucchini-noodles/ (If you don't have a julienne peeler, this one has pictures of noodles made with a regular vegetable peeler.)

Friday, June 29, 2012

High Praise for First Born Sister and Chilie Rellano Bake!


So many times, I listen to someone praise or deride something for years, and it’s not until I’ve tried it myself that I really believe that person.  Why is that?  I don’t know.  I remember being little and my mother bending over me with pointed finger asking, “Kelli, why can’t you just learn from others’ experience?” 

I still can’t answer that question, but I can say that First Born Sister is right!  That Chilie Rellano Bake she’s been talking about for years is great!  At a little over 6 net carbs per serving, it’s a great low carb dish that’s both filling and super tasty.

I was worried that this dish would just taste like another egg-based low carb dish; however, it had a firm but creamy texture and a clear green chilie flavor.

Now, First Born Sister makes this with ground meat, but I went the chicken route just because I’ve become fully New Mexican and believe that chicken pairs best with green chilie.  Sorry Sister, I have been assimilated.  This dish is a great way to use leftover chicken or turkey.

I began by throwing about four large frozen chicken breasts into boiling water.  Meanwhile, I gathered the rest of the ingredients:  some chopped onion, eggs, sour cream, ricotta (First Born Sister uses cottage cheese—I’ve tried, but I just can’t like the stuff), half of the garlic salt, green chilies (my apologies to the Great State of New Mexico—I used canned; they were Hatch brand though), and cheese.  I skipped the flour called for—quite honestly I forgot it, but loved the way it turned out, so I’ll not even worry about it from  here on out. 

Once the chicken was cooked, I shredded it using two forks, and mixed in the other half of the garlic salt.  Feel free to add other spices at this point if you want.

I then poured half of the egg mixture on the bottom of my lightly greased casserole dish.  I topped it with the chicken, onions, and a whole big can of coarsely chopped green chilies—about 2 ½ cups.   Then I poured the rest of the egg mixture over the top.

As instructed by First Born Sister, I covered it and popped it in the oven for 30 minutes, enough time to clean up the dishes and read a few more pages of A Canticle for Leibowitz.  After that I uncovered it, sprinkled it with some cheese (Q: What’s better than cheese?  A: More cheese!), and put it back in the oven for 10-15 minutes.  Once the cheese is melted and it’s set (shake it to see if it jiggles), it’s done. 

Take it out and let it rest for about 10 minutes. 

We had this with jalapeño poppers and fresh cucumbers.  Sweetie and I were singing high praises to First Born Sister for the rest of the night!

If you’re game trying this, here are two versions of the recipe: First Born Sister’s and the version I made last night.  I don’t doubt that both are good, and I know, as I have known for some time, that First Born Sister is right!

First Born Sister’s Chilie Relleno Bake

1 lb. Ground meat
1/2 onion
1/4 tsp. Garlic salt
1 large can Hatch green chilies (cut up)
1/4 cup soy flour
4 eggs
1/2 cup each:  cottage cheese, sour cream, mozzarella cheese

Brown meat add onions; drain off fat.  Add salt and pepper along with other spices to taste. Spray pan, layer meat, chilies, then cheese mixture. Mix flour, eggs and pour over pan.  Cook at 350* for 30 min. covered and then uncovered for 10-15 min or until browned.  Makes 6 servings.


Homage to First Born Sister Chilie Relleno Bake

4 large chicken breasts, or equivlant of cooked chicken or turkey
1/2 onion
1 tsp. Garlic salt
1 large can Hatch green chilies (cut up)
4 eggs
1/2 cup each:  ricotta, sour cream, Monterey jack cheese (use the cheese you have on hand)

Cook and shred chicken.  Add salt and pepper along with other spices to taste. Mix together ricotta, sour cream, cheese, and beaten eggs.  Spray pan and pour in ½ of the egg mixture, cover with meat, onions, and chilies. Top with remaining egg mixture.

Cook at 350* for 30 min. covered and then uncovered for 10-15 min or until browned. 
Makes 6 servings.


The nutrition information below is based on the version I made.  If you use soy flour, add about 4 carbs per serving. 


Thursday, June 28, 2012

Oh Nuts!


So, Sister First Born tells me that peanuts are full of yeast and mold and should not be consumed in any form.  Wait!  Mixed nuts are my go-to snack, my defense at the office, and the low-carb-savior-in-a-snack-bag lurking in the bottom of my purse.  Now, don’t get me wrong, I love other nuts, but on a budget those peanuts and mixed nuts fit in well.  On top of it, Sweetie and Only Child love peanut butter. 

Now, my change in dietary lifestyle included a promise to myself that I would not try to force my family into changing their lifestyles by some kind of I-am-the-goddess-of-all-things-consumed-in-this-house complex.  So, I only inform, and right now I’m not sure about this nutty information.  But, since I’ll give most things a try, I’ve dropped peanuts from the plate.  That, my dear reader, has led to almonds—truly my favorites.  Hence today’s experiment: almond butter.

I’ve read here and there about making your own butters, and it all seems pretty easy:  put it in a good blender, blend the heck out of it, enjoy.  That was pretty much the way of things with huge emphasis on the “blend the heck out of it” part. 

So, I started with my Magic Bullet.  No money rolling in here yet, but I love my Magic Bullet!  I use it pretty much on a daily basis.  Thanks to First Born Sister, I now even have the blender attachment.  (Got my Bullet at the big box without it.)  Thanks, First Born Sister!   But I ride my horse Tangent here.

I used both of the blades—the blend and grind one. 

I started with 1 cup of almonds and the blending blade—the one with the edges that stick up.

I blended that until it was almond meal.

Then I changed to the grinding blade.  I blended.  I shook the blender.  I took a break.  (It gets really hot.)

I took the top off and used a knife to chop it up and loosen it from the sides.

I blended some more.  I loosened it up some more.  I blended some more.  I loosened it up some more.  I let it cool down.  It gets hot!

I blended some more.  And some more.  And some more!  I added a drizzle of canola oil.  I blended some more, stopping occasionally because I didn’t want to kill my Bullet.  I blended some more.  Finally, I got this:
Good stuff?  Yeah!  Worth the effort?  Well, if I’m the only one eating it, probably so.  I don’t  eat peanut butter much, and I don’t think almond butter would be very different.  When I make low carb peanut butter fudge, what will I do?  Probably find an almond  butter with good reviews on the market and buy a jar of that. 

In short, good stuff, but lots of blending and more wear and tear on the Bullet than I was comfortable with.

Still, it is probably worth a try!  It was tasty with banana bread muffin mess-ups from the banana bread post day.  I sprinkled a little sweetener and cinnamon on them. 

Here are some links on peanuts and the creepies they carry:

Check out these articles on the problems with peanut butter, and then decide for yourself.

7/3/12 Update:  We're liking the almond butter better and better.  It's great on the banana bread--or any variation you make of that.  Wonderful on my favorite chocolate cake, and  that recipe's coming soon!

Wednesday, June 27, 2012

Today's Word: Bacon-Chicken-Veggies


In our house we believe that the only thing better than bacon is more bacon.  It really is amazing how much flavor a few slices of bacon can add to a meal.  This recipe was born of a measly two slices of bacon left in the package, getting home from work after 7 p.m. and not much in the fridge or freezer but chicken breasts and frozen vegetables.  It is absolutely great!

Bacon-Chicken-Veggies has become one word, and that word means easy and tasty.  We use our electric skillet to cook it, but you can just as easily do it in a skillet on the stovetop.  It works with thawed or frozen chicken breasts, you can cook one serving or a ton, you can change up the vegetables—we’re partial to broccoli, but use cauliflower, or a great little sugar-snap stir-fry mix.

In a low carb lifestyle, frozen vegetables can be a lifesaver for those tired nights after work.  Some research shows they may even be more nutritious than produce at the local grocery store.  Of course, if you can get really fresh—from your own garden or the farmer’s market, that’s really the best way to go.  Frozen vegetables are also cheap and one of the main things that make me rant against the “it’s cheaper to eat junk food” excuse for our nation being so fat.  With a recipe like this, you’ll see that easy, cheap, convenient and good can go hand-in-hand.  (You did catch that part about just being able to throw the chicken in frozen, right?)

To learn more on the veggie debate, here’s an interesting article about Fresh vs. Frozen veggies.

Here’s how Bacon-Chicken-Veggies generally works for me:

  • Get home from work, pat the dogs, drop the bags and purse on the desk.
  • Grab the electric skillet out of the cabinet.
  • Cut up bacon with kitchen shears and throw in the pan.
  • Go get out of work clothes.
  • Stir bacon.
  • Go feed chickens.
  • Throw chicken in while talking with Sweetie and the dogs.
  • Turn chicken, add a bit of water and cover.
  • Put away dishes washed before leaving for work.
  • Talk to Sweetie and the dogs some more.
  • Throw vegetables in the middle.
  • Decide what’s worth watching on TV.
  • Dinner!


That’s really the recipe.  You can do it with any kind of frozen vegetables, and it’s also good with sausages or pork chops.  In fact, most work nights, some version of this is what we have.  The bacon usually doesn't make it in the pan if we're having sausages. In short, this isn't really a recipe, it’s just good dinner, and it’s in one pan!

Bacon-Chicken-Veggies

3 thin slices bacon
4 large chicken breasts
3 cups frozen veggies

Cut up bacon into small pieces and sauté in pan until soft but done. Place chicken breasts in pan, season to your lliking, allow to sizzle for a few minutes.

Turn over, re-season if desired, add a little bit of water, cover and let simmer for about 15 minutes or until done.

Move chicken breasts to the edges of the pan and toss frozen veggies in the center, season veggies as desired.  Cover and steam until done.

Before serving, toss veggies in pan juices.

This can be easily done with less or more chicken, and of course, you can do it with fresh veggies.

*The nutrition information here is for this cooked with frozen broccoli.  It should only vary a little bit with other frozen vegetables as long as you make sure that there aren't any high sugar veggies in the mix, and there's nothing else added to the veggies.  Read those ingredient and nutrition labels! 

Monday, June 25, 2012

Bananas for Banana Bread!


Bananas for Banana Bread!


Sorry, I just couldn't resist that title.  I love banana bread, and so does my better half.  Recently, he's had to give up bread, but having this protein powder version of banana bread has made it easier.  (Of course the cheesy bread I make from the Pizza Crust recipe mentioned earlier this month helps.)  He makes a peanut butter and banana bread sandwich to take to work in his lunch every day now.  Of course, the banana bread isn't always banana.

I use the Body Fortress protein powder because it's  easy to find at the local big box.  My sister, who has some knowledge of protein powder also thinks it's one of the better ones.

This recipe is based on one I found on the internet, but it's been modified enough that I'm willing to call it my own.  I've made banana bread from it, strawberry-banana bread, pumpkin bread, lemon muffins, and a plain vanilla bread which was great as the base for strawberry shortcake.  I made it in a muffin top or whoopie pie pan, and served it with fresh sliced strawberries and whipped cream (actually whup if you're counting).  That was really great! 

In essence, it's a very flexible recipe that I encourage you to play with. It's not the lowest carb sweet-treat, but it does fill a spot for holiday baking, and it really makes the holidays easier when you don't feel like you can't eat anything.  And birthdays and family gatherings and supper on the grounds and that office party and. . .

It starts like a basic quick bread:  mix together your eggs, oil, cream, and Splenda (or your favorite sweetener).  Then add in the dry ingredients and the bananas--make sure they're good and ripe. (Remember, when you have bananas that are getting too ripe and don't have time to make banana bread, you can put them in the freezer.  Warning: when you thaw them out they'll be really runny and mushy, but they make the best banana bread!)  


The batter will be about the thickness of paint.  That's a good thing to judge in case you want to play with the recipe's main ingredient.  You'll want to look for a similar consistency by adding more of something wet, or a bit more protein powder. 

In the picture below, I've doubled the recipe. 

I do spray my pan with non-stick spray.  Here's today's ready to go into the oven.


[Blushing confession:  Mine dripped over some today and made a lovely pool of banana bread on the bottom of the oven.  It's never done that, but every day is full of surprises!]

Here it is just out of the oven.  I scraped off the drip.  Luckily I got a cookie sheet under it before too much had dripped on the bottom of the oven.  Oh well, my son and I got to preview it with funky flat muffins.  They were good!


Once it's done, let it cool for 10 minutes or so before removing it from the pan to a rack.  Let it cool before slicing it.  Store in the refrigerator; protein powder baked goods seem to have a propensity for going bad after a few days on the counter. 


Banana Bread   

3 eggs
3 tablespoons oil
1/4 cup heavy cream (half and half works fine)
1 1/4 cups vanilla whey protein powder
2 teaspoons baking powder
1/3 cup Splenda
1/4 teaspoon cinnamon
2 ripe bananas

Preheat oven to 325 degrees.  Pam or lightly oil a 9x5 loaf pan or line 8 muffin tins with paper liners. Combine the eggs, oil, and cream; stir to blend. Add the whey powder, baking powder, Splenda, bananas and cinnamon. 

Bake at 325 degrees for about 35 minutes or until a toothpick inserted in the middle comes out clean and dry. If it starts to get to dark on the top, put some aluminum foil over it lightly.  Serves 12.


*For strawberry cake, use fresh strawberries or frozen.  Use ½ cup.  If you want more strawberry flavor, add in 1/2 package of strawberry sugar-free jell-o.  Omit cinnamon. 

*For pumpkin, use ½ cup pumpkin.  Add pumpkin pie spice.  


*To make a plain cake for berry shortcake, replace the bananas with 1/2 cup sour cream.  Omit cinnamon if desired. 


7/3 Update:
Made this today with shredded zucchini and used sour cream as described above.  Wonderful muffins!


Friday, June 22, 2012

Faux-tato Salad

It's that time of year.  You know the one that involves BBQ and potato salad?  Yeah.  What's a lonely low-carbber to do at a party or picnic where potato salad flaunts itself on that red checkered tablecloth?  There's only one answer: faux-tato salad!


This little gem is one of those recipes that's freely available all over the web.  This is my rendition of it based on what I do with a potato salad.  Take some time to check out others' recipes--search for "cauliflower potato salad," or "low-carb potato salad."  Play with it, and give it your own signature.


Okay, ready for that summer cookout?


Faux-Tato Salad
(The measurements here are for the batch I made today.  Adjust as you see fit depending on how much you're making.) 


1-16 ounce bag frozen cauliflower, or one head cooked—chopped small
3 boiled eggs, chopped
1/4 cup Black olives to taste, chopped small
1/4 cup Pickles to taste, chopped small
1/4 cup Onion to taste, chopped finely
2/3 cup Ranch dressing
1 Tbsp. Mustard
Other spices to taste

Prep your cauliflower.  If you’re using frozen, cook according to package directions.  With fresh, cut up into florets and steam until fairly soft, but not mushy.  Allow to cool in a colander or sieve to drain well.

Meanwhile, cut up eggs, onion, olives, and pickles. I have to take a moment and mention how much I love my mini-food processor.  I really wanted a food processor, but didn't want a huge one.  I got this small one at our local big box and absolutely love it.  Less than $10 has made me happy on a very consistent basis.


Chop cauliflower well, but not too finely.  I use my kitchen shears and do it in the bowl. 


Throw in the eggs and vegetables and mix  well.  


Add in mayonnaise, a squeeze of mustard, and a dash of pickle juice.  Stir in and taste, adding salt, pepper, garlic, or other spices as desired.  Chill and enjoy.  


This assumes the recipe as made above serves six.  If you're counting carbs, don't forget to deduct the fiber count from the total carbs to get your net carbs


Wednesday, June 20, 2012

A Little Sassy with Your Water


Well, I had thought that today would bring a tasty post on pork chops and Zucchini Hash Browns.  Alas, it's not to be.  While they weren't bad, they weren't great either.  Really, nothing to share there.  However, with the heat hovering around the 100s, it's definitely a time to keep hydrated, and nothing does that as well as water. 

Last summer while visiting my mom, one of my sisters made Sassy Water.  I'd forgotten all about it until she did it again this summer.  It's an easy mix, aesthetically pleasing, and tasty to boot.  

Apparently, Sassy Water is a part of the Flat Belly Diet.  Flat belly or not, it’s fabulously refreshing on a hot day like the one today promises to be.  On top of that, it’s a simple concoction of water, lemon, cucumber, and ginger.  Garnished with a sprig or two of mint, it’s especially beautiful.

Now, since there’s no need to linger over a simple process. . .


Sassy Water

1 lemon
½ medium cucumber
1 inch ginger root
Water

Slice your lemon and cucumber fairly thin.  If you slice the lemon paper thin, the water will be very lemony.  I prefer to slice mine a little thicker, about ¼ inch thick or so.  Most of you know my math skills, so go with your own idea of thin and preference for lemon in water.  Place those in your pitcher. 

Peel and grate the ginger, and add it to the pitcher.  (You can make it easier to remove later or for a second go-round of Sassy Water by placing it in a coffee filter and tying it up.

Fill your pitcher with water and let soak overnight.  The next morning, taste.  If it’s strong enough, remove the lemon, cucumber and ginger.  You can use those to get one more batch going while you work on the other one, or you can leave them in the pitcher, drink the water throughout the day and refill it at night for the next day’s batch. 

Feel free to munch on the cucumbers once you take them out of the water.  Being stored in cold water will keep them crisp.

With this simple recipe, there’s no reason to stay thirsty, my friend.

Tuesday, June 19, 2012

Miss Pizza Much?

While this is not necessarily a recipe for induction on Atkins, it is a life saver when it comes down to dealing with a brutally maniacal pizza craving.  I did without pizza for 16 months.  I was okay.  But one day, the pizza monster reared its ugly head.  All I have to say is "Thank you Erica!"  Erica of the Stuff I Make My Husband Blog has created an easy low carb pizza crust that will tame any wild beast pizza craving that may come your way with her hybrid pizza crust recipe.

In a pinch I have used soy flour instead of the coconut flour.  We've also played with substituting some different cheeses for part of the mozzarella.

Hungry yet?  Scoot on over to her blog and check it out.  Check out our results  here:

You start by baking the crust.  Here's Jack pressing out our pie!  Erica's tip about damp hands for doing this is right on target.  Also, silpat or silicone liners work, parchment paper rocks, but foil is liable to mess up.


These do freeze well.  At least for a couple of weeks.  The one we put in the freezer didn't last longer than that.  So, making extra isn't a bad idea.  Experiment and make small personal-sized pizza crusts for those spur of the moment cravings.

Jack makes a beautifully artistic looking pizza.


Bake it up with the toppings.  We use our "roundy-round" and it's brilliant!


Italian sausage, jalapenos, onions, pepperoni, spices and love!


Poppels believes that she should get the first piece.


I also make it in a cookie sheet as flat bread, since Jack's given up carb filled bread. As a sandwich, I cut mine small because these will fill you up!


Moral of the story?  Erica rocks!  Her hybrid pizza crust recipe is divine.  The pizza beast is slain!

Monday, June 18, 2012

Jalapeno Poppers

Well, I've decided to start a blog since I post so many recipes and photos of them. I figured it would be easier to share here.  So, we might as well start with one of the favorites: Jalapeno Poppers.  These are a wonderful side dish or appetizer.  They're simple and only have three ingredients.

Jalapeno Poppers, Crisp Veggies, and Cheese.  Perfect Party Snacks!


Ingredients:
(I'm not giving amounts, because this is one of those recipes where it depends on how many you want to make.)

  • Jalapenos
  • Cream Cheese
  • Thin Sliced Bacon

Instructions:

  1. Set oven to 350 degrees.
  2. Wash jalapenos and cut in half lengthwise.
  3. Use a grapefruit spoon or rounded serrated knife to remove the seeds and veins.  (I highly recommend gloves for this part.  Really!  Those peppers can get hot!)
  4. Decide whether you're going to make closed poppers--ones where you stick the jalapenos back together, or open ones--ones where you cook the halves separately. (When I'm serving more people, I make them in halves.  They go further.)
  5. Using a butter knife, fill jalapenos with cream cheese.  
  6. If you are doing whole poppers, don't feel the need to fill the jalapeno totally full.  The cream cheese will expand.
  7. Wrap jalapenos in bacon, using a toothpick to secure it if necessary.  When I make them using half, I cut the bacon in half lengthwise, resulting in a skinnier slice of bacon.  Use those kitchen shears!
  8. Place on a rack on a rimmed cookie sheet.  
  9. Bake at least 30 minutes, checking afterward until the bacon is as done as you like it.
  10. Enjoy!
Nutrition Facts are for one whole popper.